

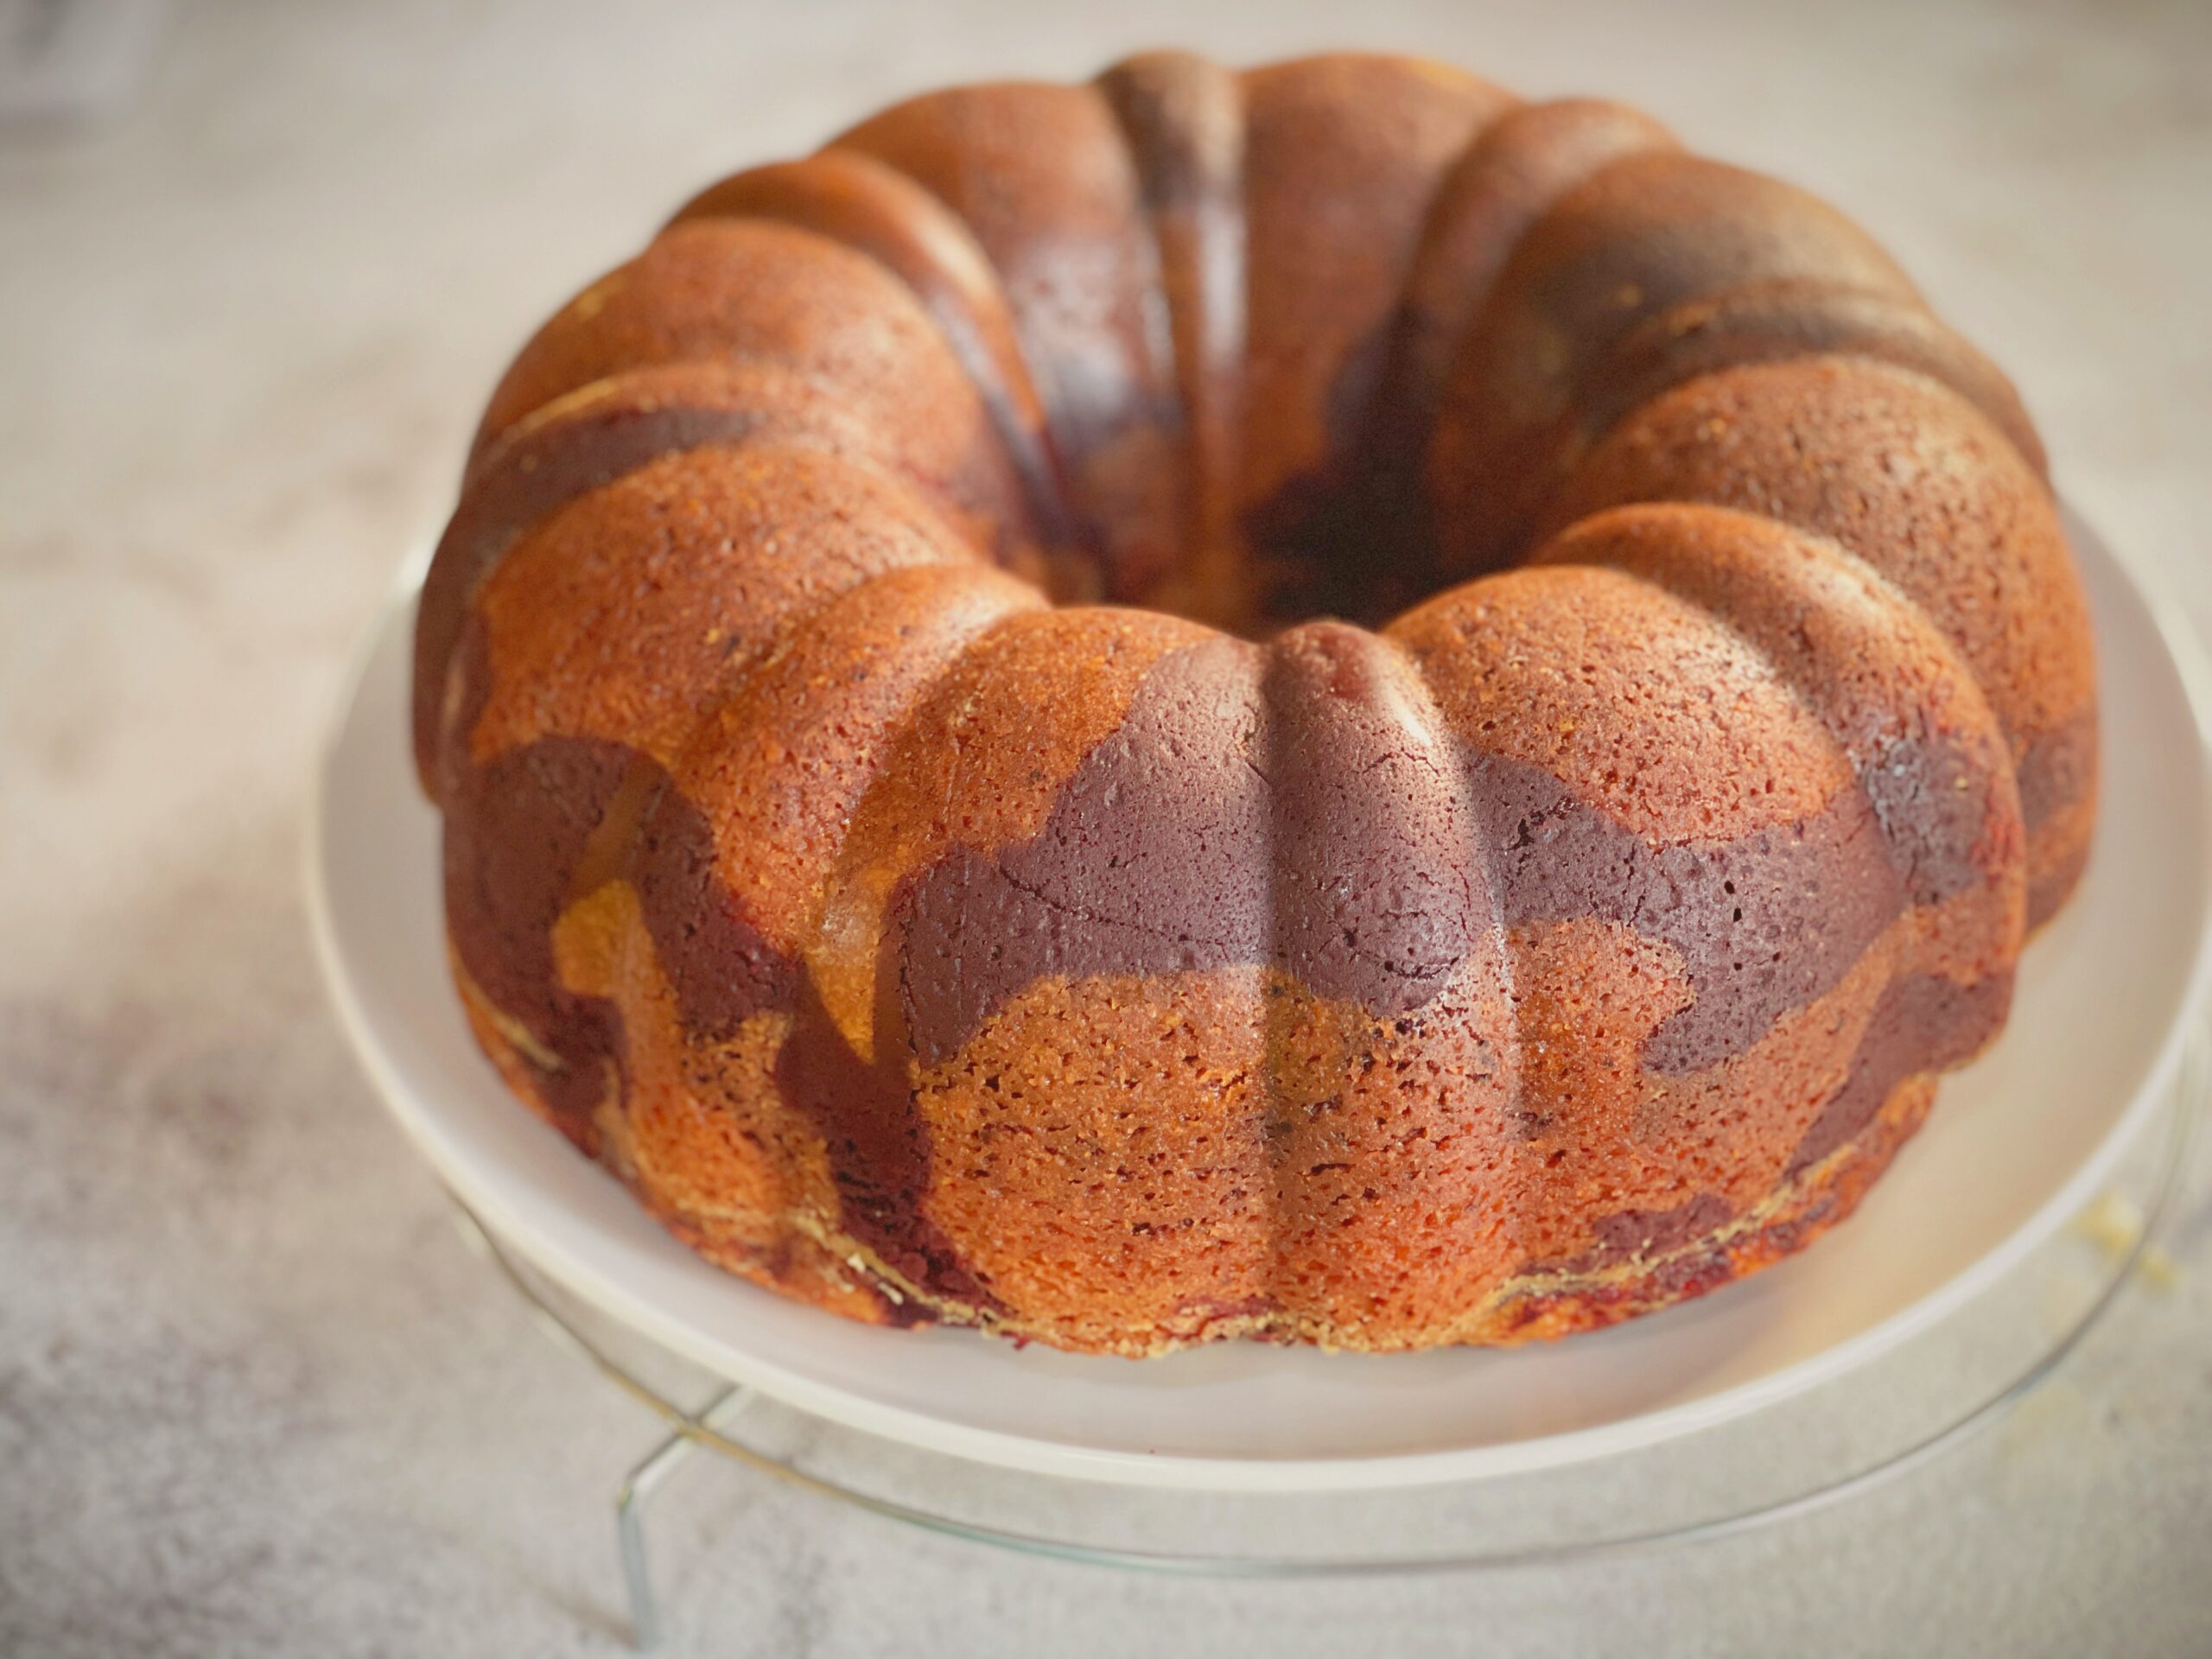
This Red Velvet Marble Cake doesn’t ask to be the centre of attention, and then quietly becomes exactly that. There’s something about it that makes people pause before cutting in — maybe it’s the swirl, maybe it’s the simplicity of it sitting there in its bundt shape, waiting.
I baked this for the first time on a Valentine’s Day — not because I’m someone who plans elaborate things for the fourteenth of February, but because I wanted something on the table that looked like effort without actually demanding a whole day in the kitchen. Red velvet has always felt a little indulgent to me, a little dressed-up, and pairing it with a simple vanilla pound cake batter felt like the right kind of balance — rich, but not over the top.
What I didn’t expect was how much my family would gravitate towards the swirl itself before they even tasted a bite. Ashutosh, who notices presentation before flavour, was the one who said the slices looked “almost too neat to cut.” That’s the funny thing about this cake — it looks like it took skill and patience, when really, it’s one of the simplest tricks in baking once you know it.
I’ll be honest, the first time I made a marble cake years ago, I did what most of us are taught to do — pour the two batters in and swirl them together with a knife. It never quite worked. The colours always blended into a muddy in-between instead of staying distinct. It took me a while to realise the problem wasn’t my swirling technique — it was the method itself.
This cake uses a layering approach instead of swirling, and it changed marble cakes for me completely. You simply drop spoonfuls of one batter, then the other, directly on top of each other in the pan. No knife, no guesswork, no risk of overdoing it. The oven does the rest, and what comes out is a cake with clean, defined ribbons of red and cream running through every slice.
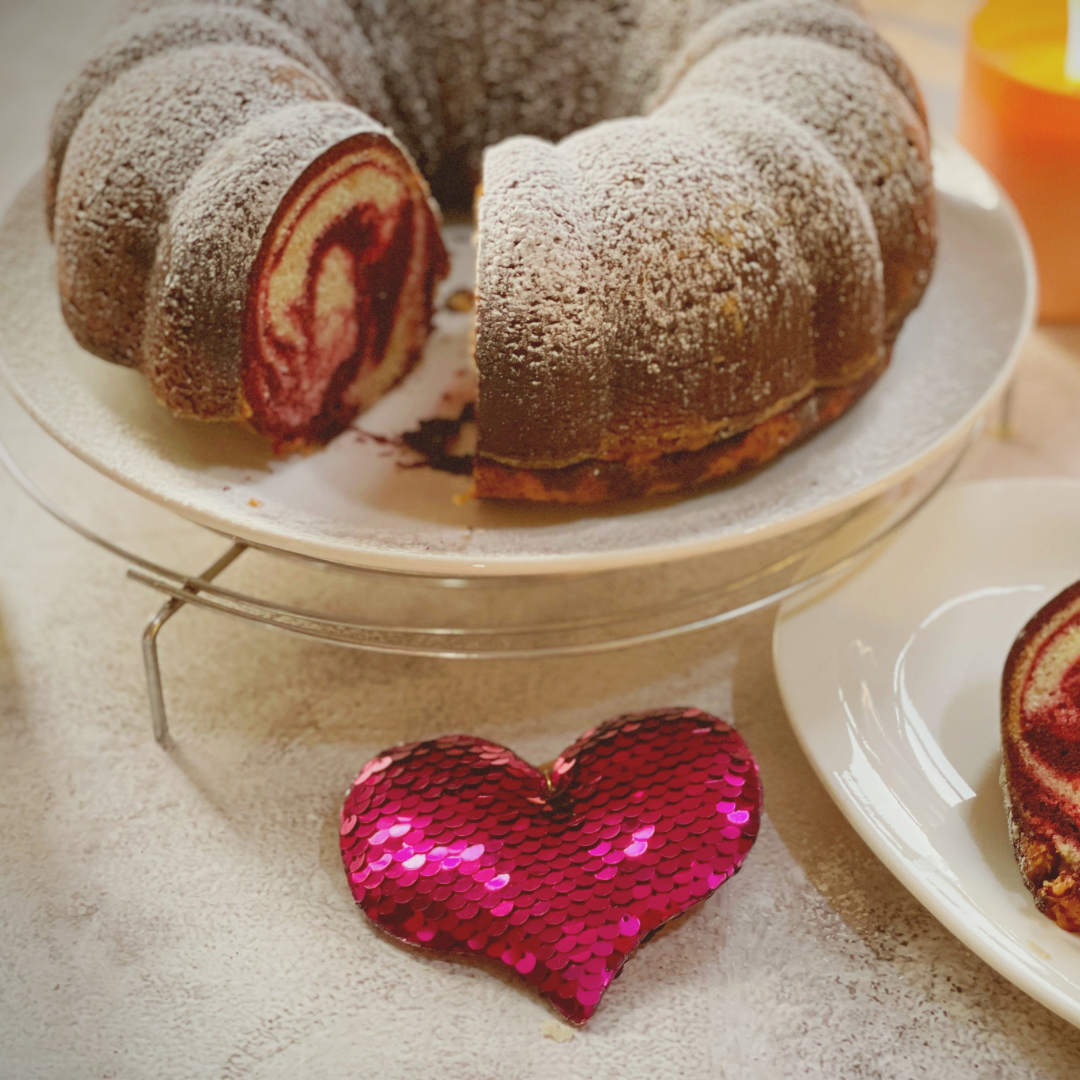
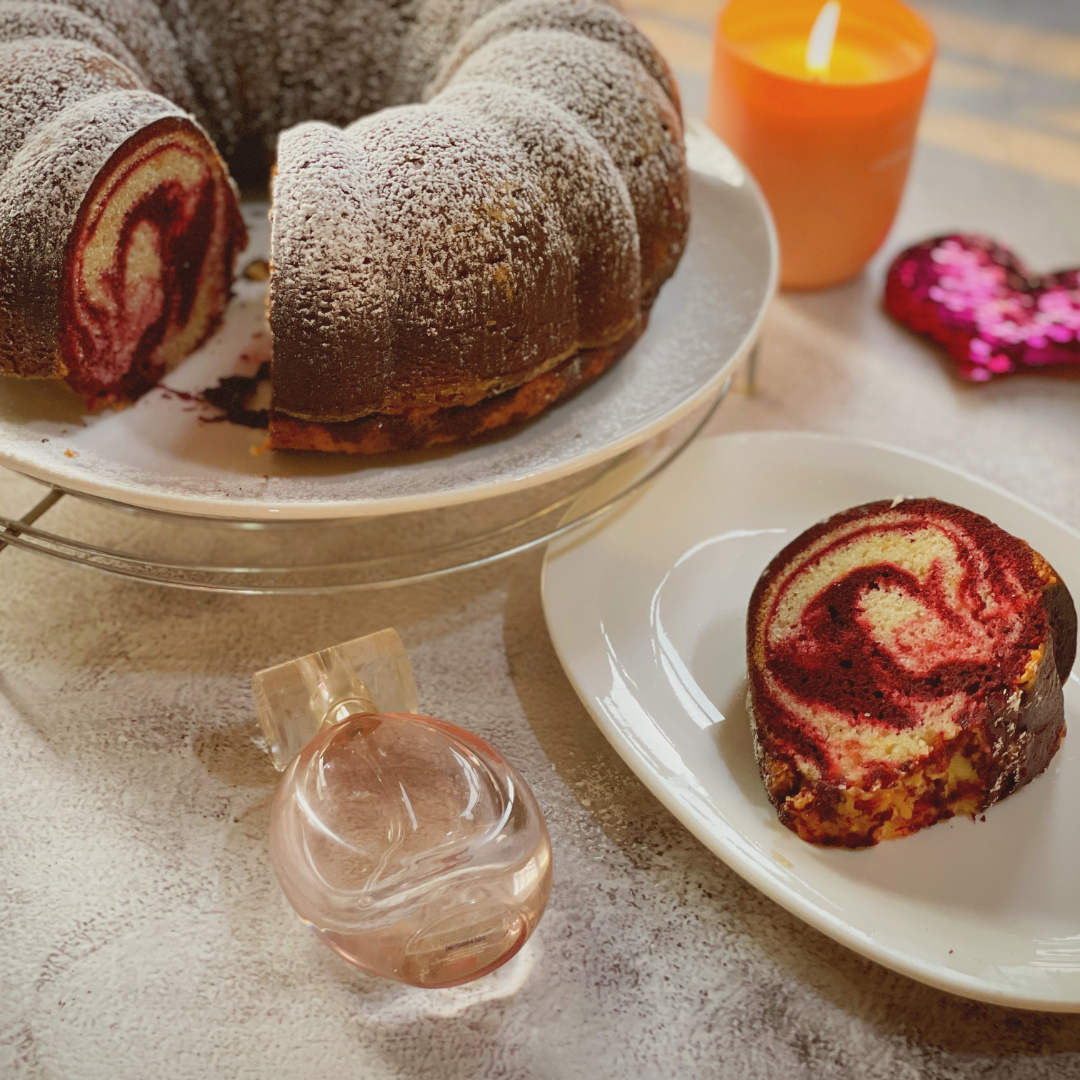
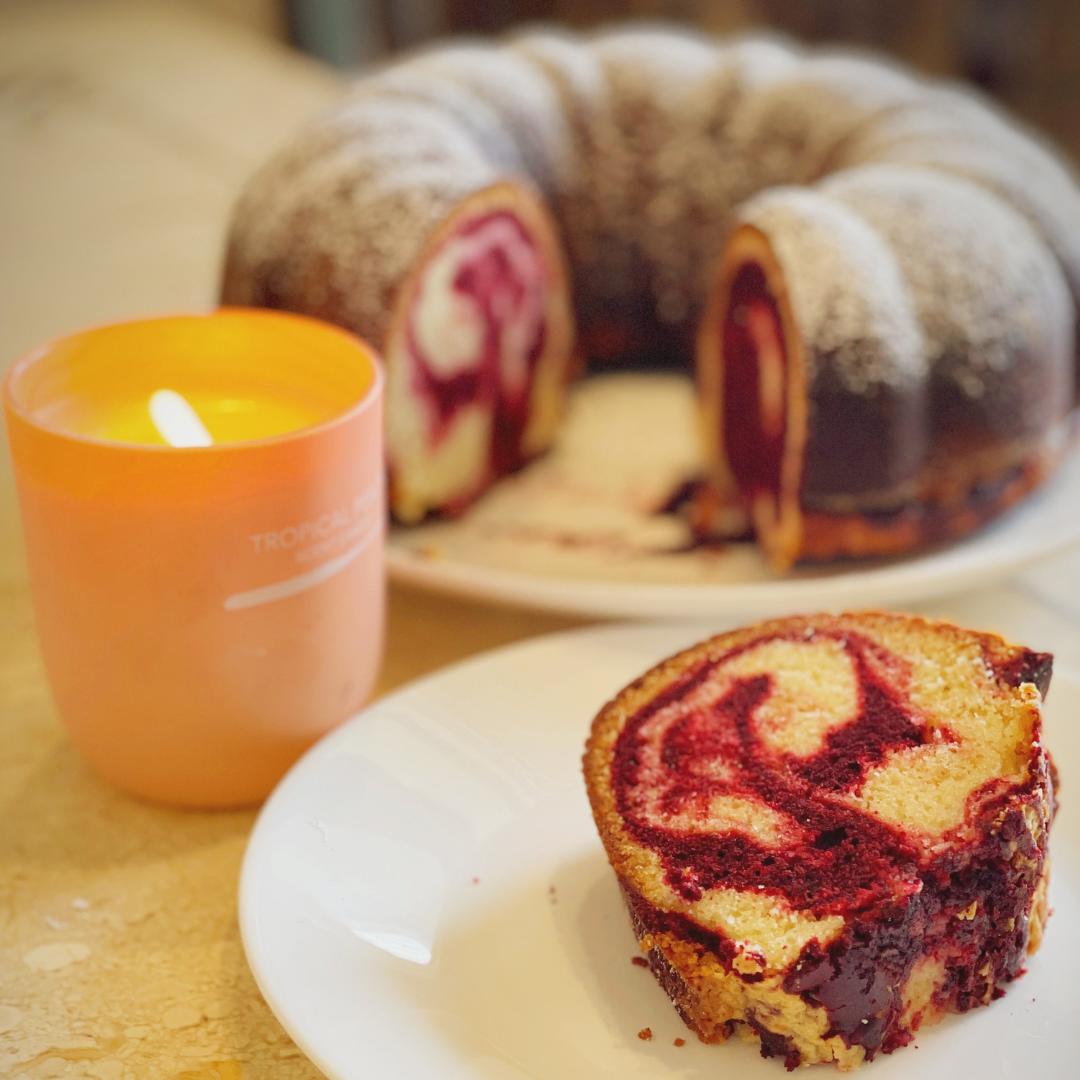
It’s dense in the way a good pound cake should be, moist from the sour cream and butter, and just sweet enough that you don’t need anything more than a light dusting of powdered sugar on top. Whether you’re making it for Valentine’s Day, Christmas, or simply because you want red and white on your dessert table for no particular reason at all — this one earns its place.
Red Velvet Marble Cake — Ingredients and Substitutions
- Cake flour – Cake flour is what gives this cake its soft, tender crumb. If cake flour isn’t available where you live, don’t worry — I’ve made a full tutorial on how to make your own cake flour substitute at home using ingredients you already have. Watch: How to Make Cake Flour at Home
- Butter – I use salted butter in this recipe. If you only have unsalted butter on hand, simply increase the salt in the recipe by ½ teaspoon to balance the flavour.
- Sour cream – Full-fat sour cream gives the richest results, but whole milk Greek yogurt, 2% Greek yogurt, or even plain nonfat Greek yogurt will all work well as substitutes.
- Milk – Stick to 2% or whole milk here. The extra fat content is what keeps this cake moist rather than dry or crumbly.
- Unsweetened cocoa powder – Use unsweetened (natural) cocoa powder rather than Dutch-processed. Natural cocoa lets the red colour in the swirl show through far more vibrantly.
- Red food colour – Either liquid red food colour or red food colouring paste will work for this recipe.
How to Make Red Velvet Marble Cake
Step 1: Preheat your oven to 350°F (175°C). Grease and flour a 10–15 cup bundt pan thoroughly, making sure to get into every groove.
Step 2: In a medium bowl, whisk together the cake flour, baking powder, and salt. Set this aside.
Step 3: In the bowl of a stand mixer fitted with a paddle attachment, beat together the butter, sugar, and sour cream until well combined and slightly fluffy. Mix in the vanilla extract until fully incorporated.
Step 4: Add the eggs in one at a time, mixing well after each addition before adding the next. This helps the batter stay smooth and prevents curdling.
Step 5: With the mixer on low speed, stir in the flour mixture until just incorporated — don’t overmix. Then stir in the milk until just combined.
Step 6: In a separate large bowl, combine 2½ cups of the plain batter with the cocoa powder, milk, and red food colouring. Mix until smooth and evenly coloured — this is your red velvet swirl batter.
Step 7: Using a ¼-cup measuring cup, drop two scoops of the plain batter into your prepared bundt pan. Follow with one scoop of the red velvet batter directly on top.
Step 8: Continue alternating — two scoops plain, one scoop red velvet — layering them on top of each other until both batters are used up. Resist the urge to swirl with a knife; the layering alone creates the marbled effect once baked.

Step 9: Bake for 50–60 minutes, or until a wooden toothpick inserted into the centre comes out clean.
Step 10: Let the cake cool in the pan on a wire rack for 15 minutes. Then carefully invert it onto the rack and let it cool completely before slicing.
Step 11: Dust the cooled cake with powdered sugar before serving, if you like that classic finished look.
Recipe Tips
A few things that make all the difference when you’re baking a red velvet marble cake at home:
- For the moistest cake: Don’t skip the full-fat sour cream and whole milk — the fat content is what keeps this cake from drying out, especially since it bakes for nearly an hour.
- Prepping your bundt pan properly: A bundt pan with intricate grooves can be tricky to release from. Grease every corner generously and then dust with flour, tapping out the excess, so the cake slides out cleanly.
- No cake flour on hand? Don’t substitute and hope for the best — use the proper conversion method. I’ve shown exactly how to do this in my video linked above, so the texture of your cake doesn’t get affected.
- Make-ahead and freezing: This cake freezes beautifully. Either freeze the whole baked and cooled cake wrapped tightly in plastic wrap, or slice it first and wrap individual pieces — perfect for when you want a slice without defrosting the whole thing.
These small adjustments are what take a good red velvet marble cake to a great one.”
Red Velvet Marble Cake
Equipment
- Stand mixer with paddle attachment
- 10–15 cup bundt pan
- ¼-cup measuring cup
- Wire cooling rack
Ingredients
Cake Batter
- 3 cups cake flour
- 2 teaspoons baking powder
- ½ teaspoon salt
- 1 cup butter (at room temperature)
- 2½ cups granulated sugar
- ½ cup sour cream
- 1 tablespoon vanilla extract
- 5 large eggs
- ½ cup milk
Red Velvet Swirl
- ⅓ cup unsweetened cocoa powder
- 5 tablespoons milk
- 1 tablespoon red food colour
Instructions
- Preheat oven to 350°F. Grease and flour a 10–15 cup bundt pan.
- In a medium bowl, whisk together cake flour, baking powder, and salt.
- In the bowl of a stand mixer fitted with a paddle attachment, beat together butter, sugar, and sour cream until well combined.
- Stir in vanilla extract until combined.
- Add eggs one at a time, mixing well after each addition.
- On low speed, stir in the flour mixture until just incorporated.
- Stir in milk until combined.
- In a separate large bowl, stir together 2½ cups of the batter, cocoa powder, milk, and red food colouring until well combined.
- Using a ¼-cup measuring cup, drop two scoops of plain batter into the prepared bundt pan.
- Drop one scoop of red velvet swirl batter on top of the plain batter.
- Continue alternating between plain and red velvet swirl batters until both are used up.
- Bake for 50–60 minutes, or until a wooden toothpick inserted into the centre comes out clean.
- Cool the cake in the pan on a wire rack for 15 minutes.
- Invert the cake onto the wire rack and cool completely.
- Dust with powdered sugar before serving, if desired.
Video
Notes
Notes
- Cake flour helps give this cake its tender crumb. If unavailable, you can substitute it — watch my full tutorial here: How to Make Cake Flour at Home
- I use salted butter. If using unsalted, increase salt by ½ teaspoon.
- Full-fat sour cream, whole milk Greek yogurt, 2% Greek yogurt, or plain nonfat Greek yogurt can all be used in place of sour cream.
- Use 2% or whole milk for the moistest texture.
- Use unsweetened (natural) cocoa powder rather than Dutch-processed for a more vibrant red swirl.
- Watch the full recipe video here: Red Velvet Marble Cake — Bake with Deepali
- Nutrition values are estimates.
Recipe FAQs
Can I make this cake without a bundt pan?
Yes — you can use a regular loaf pan or a round cake tin instead. Keep an eye on the bake time though, since a flatter or smaller pan will usually bake faster than a tall bundt pan, so start checking around the 40-minute mark with a toothpick.
Why did my red and plain batters blend into each other instead of staying separate?
This usually happens if the batters are too thin, or if you stir too vigorously while layering them into the pan. Keep your scoops gentle and avoid dragging a spoon through the pan once the batter is in — let the layering do the work rather than trying to help it along.
Can I skip the red food colour?
You can, though the cake will lose its signature red velvet look — the cocoa swirl will still taste rich, just appear more brown than red. If you’d rather avoid synthetic colour, a small amount of beetroot powder can work as a natural substitute, though the shade will be more muted.
Storage
Like most bundt cakes, this red velvet marble cake stays fresh longer than you’d expect when stored properly.” Store this cake in an airtight container at room temperature, where it will stay fresh for 3–4 days.
Related Recipes You’ll Love
Large Batch Vanilla Bundt Cake
Only 3 Ingredient Butter Cookies
Want more baking magic in your life? Subscribe to my YouTube channel — Deepali Ohri — for new recipes every week. Follow along for daily baking inspiration: Instagram | Pinterest | Facebook.